- Type CUI at the command line.
- Press the new command button
- Create a new Toolbar
- Type in the following format of the vba macro to get it to load and run, notice that the folder separators go in the wrong direction: ^C^C-vbarun;"C:/Documents and Settings/user/My Documents/Autodesk/PipeNetworkQuantity-0.1.dvb!ExcelExportLengthCount.ExportToExcelLengthCount";
- Add an icon and drag the command from the lower left area up to the new toolbar
A place to put reminders on how to do things or commands that I will use rarely, but are useful to know.
Saturday, June 30, 2007
Adding a VBA Macro To a Toolbar
Thursday, June 28, 2007
Pipe Networks Style Overrides
Just put the check mark in the box and select the style you want it to be. In 2007 you need to have the style already created, in 2008 the ability to create or copy and edit a style from the command is there.
Wednesday, June 27, 2007
Mapcheck Report in 2008
I told my coworker I was going to post on something else, but I found this new feature too cool to pass up and solves the problem he was having exporting a mapcheck report for multiple parcels. This post is mainly borrowed from the tutorials document on the Autodesk website.
Exercise 3: Exporting Parcel Data
In this exercise, you will generate a mapcheck report for the parcels in the residential road at the top right of the drawing.
In AutoCAD Civil 3D you can export inverse or mapcheck reports for either a single parcel, a series of parcels, or all parcels in a site.
For more information, see the AutoCAD Civil 3D Help topic Exporting a Parcel Inverse or Mapcheck Report.
To export parcel data
On the Toolspace Prospector tab, expand Sites ➤ Site 1 ➤ Parcels.
In the list view below the Prospector tree, click the heading of the Number column to sort the parcels by number.
- Select parcels that you need a report for. You can use any of the standard windows methods to select and deselect the parcels.
In the list view, right-click and select Export Analysis.
- In the Export Parcel Analysis dialog box, specify the following settings:
- Destination File: Place it in a place and with a name you can remember the tutorial uses a txt file like this: ExportAnalysis.txt
- Analysis Type: Mapcheck Analysis
- Destination File: Place it in a place and with a name you can remember the tutorial uses a txt file like this: ExportAnalysis.txt
- Click OK.
The ExportAnalysis.txt file automatically opens in the text editor associated with AutoCAD Civil 3D and is saved in the location you specified in step 5.
No more copying and pasting for each parcel or exporting into another program to get the reports, unless of course you need it in another format.
Tuesday, June 26, 2007
Sewer Lateral Layout
- First create a dynamic block or use the one found here.
- Add the label to a line and curve label, I have created a sample at the same location in step 1.
- Add the label at the locations along the alignment where you want the laterals to go.
- Flip any labels to the other side of the line or have two styles on for left and one for right.
- Make any adjustments you need to make.
- Explode the line and curve labels twice.
- If you are using Civil 3D you will need to save, close and reopen the drawing. Civil 3D 2007 crashes when you try to move a grip of the dynamic block. Civil 3D 2008 tends to like this a little more.
- Move the grips to the property line or whatever location the lateral needs to go to.
There may be other unforeseen problems, but should save step in rotating each sewer lateral block.
Monday, June 25, 2007
Combining Pipe Networks
When you do this make sure the pipes and structures have different names or change them after you do the import. Having pipes or structures of the same name will cause problems in the drawing.
Saturday, June 23, 2007
DWG Version Converter
For Civil 3D files you will need to make sure Proxygraphics is set to 1 before sending out for them to see something other than empty rectangles. Also the labels don't rotate to match the paperspace viewport, only rotate per Model Space.
Evan Almighty
First the whole dam portion of the plot was ridiculous and totally out of whack with reality. For one a dam is in no way governed by building codes as mentioned more than once in the movie. Dams, at least in the State of California, are governed by the Water Resources, Division of Safety of Dams or the Army Corps of Engineers. While the supporting structures are governed by the building codes, the dam is in no way contained in the building code.
The premise of a Congressman being able to control the building process enough to have a dam of the size shown built shabbily is also ridiculous considering the amount of people involved in the construction of a dam. First you have the agency who needs the dam for drinking water storage or for Storm flow storage. Since most agencies no longer keep a large number of staff on hand an engineering company is hired to design the structure, then you have a Contractor who is going to build the dam. Then you have all of the people who are against dams, regardless of the benefits, that would point out any and all perceived design flaw. Each participant has some liability in the final output (except for the anti-dam people), I could concede that one participant could do the faulty construction, I do not think a Congressmen could pull this off, let alone profit from it. While Civil Engineers are not specifically singled out, the film does shed Civil Engineers in a bad light since it is guilt by association.
My next beef with the film is the impression that development is inherently bad because it occupies land previously undeveloped. All I have to ask is where are these people supposed to live? All these people are are children and immigrants (both legal and illegal). The only way to stop the destruction of natural places is to stop the production of people. I don't think that is a realistic solution to the problem. Another solution is infill in existing cities and towns. Unfortunately this also has problems, since a portion of people are adamantly against this. For instance any development project in the award winning downtown in the city San Luis Obispo, where I work, is derided as not fitting in and potentially destroying the character of downtown. How can this be, since this is how the downtown was created in the first place. The downtown of San Luis Obispo was created by various building dating from the mid 1700 to current day. People are also against building up, at least a portion of people in my town, so it looks like the current proposal to increase the height of buildings may not go through. An increased height would potentially increase the density of downtown and prevent the development of agricultural or raw land.
Quite frankly I am tired of going to movies and being preached at on environmental issues. It is especially galling that the movie cost $175 million dollars to make. If they really wanted to make a difference they would have saved 20% ($35,000,000) of the cost of the movie, bought the land they profess should be saved, and prominently provide an advertisement of where people could add to the fund (either at the beginning or end of the movie or both). But I guess they really don't believe it and are only trying to sell tickets.
Tuesday, June 19, 2007
One Vertical Curve for Sag and Crest
To have one style for sag and crest vertical curves with and without high and low points. So you can just have on main label style for sag and crests.
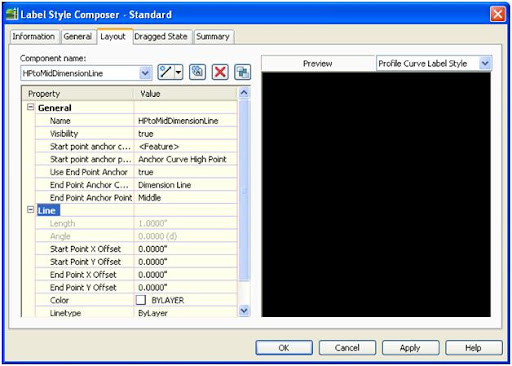
- Add a line to the label. Set the Start point anchor component to the Anchor Curve High Point and the End Point Anchor to the Midpoint of the Dimension Line. Give the line a name so you can remember what it does.
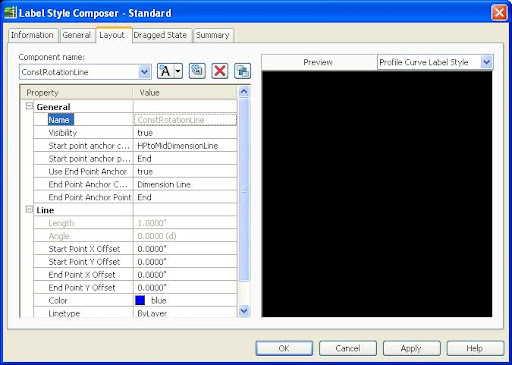
- Next create a line construction line which will be hidden in the style, but will help rotate the text parallel to the dimension line. It is needed because we have to tie to the previous line created and have a way to make it look like the other text in the label. If you skip this line then it will be nearly impossible to get the rotation right as the label is moved up and down.
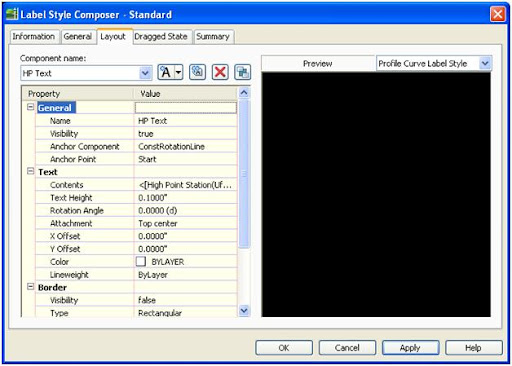
- Next add the text to the label for the HP. Use the anchor point of the start of the construction line you created in the last step. Add whatever text you require for the HP.
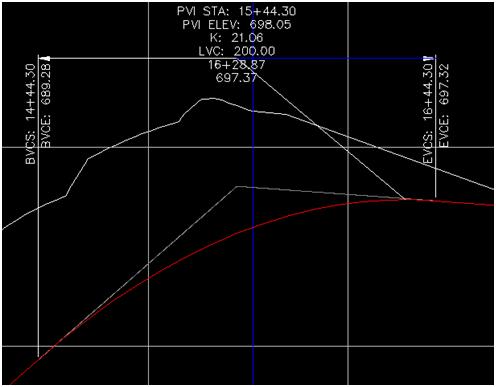
- Here is a picture of how the label looks.
- Just change the visibility of the HPtoMidDimensionLine and the ConstRotationLine to false so it not seen in the final style.
- Repeat the steps for the low point, using different names for the components.
- Since the low point and high point portions of the label are anchored to the low or high point the those portions of the label won't show if there isn't a high or low point of the curve.
I have also uploaded the HP portion of the label here.
Friday, June 15, 2007
Sheet Set Manager
Tuesday, June 12, 2007
Profile and Profile View Labels
Monday, June 11, 2007
Working Between Civil 3D 2007 & 2008
Autodesk University
I went last year and had a fun time.
Sunday, June 10, 2007
Google Analytics
Its really eye opening to see where Civil 3D users are that visit the site, or visit it accidentally. So far a total of 21 countries are represented:
United States - Canada - Costa Rica - Peru - Spain - Bosnia and Herzegovina - Italy - Serbia and Montenegro - Germany - Belgium - Netherlands - United Kingdom - Romania - India - Iran - Malaysia - Isreal - South Korea - Australia - New Zealand - Kenya
Most of the viewers are from the United States though, with 25 states and the District of Columbia represented, mostly from California though.
Most of the users where refered by caddigest.com
Thursday, June 07, 2007
XML Notepad
It makes it alot easier to see and change values in the XML file.
Tuesday, June 05, 2007
Taskbar

One session of Civil 3D, two files open with Taskbar setting of 1:
 The first one is the default and to switch between drawings use alt+tab, for the second one switch between drawings with alt+tab.
The option to change it in Microsoft Office products is under options. This is from Microsoft Office 2007.
 The change in the UI for the Microsoft Office is a bigger change the CTRL click for subentities in AutoCAD.
Increase Command Line History
http://discussion.autodesk.com/thread.jspa?messageID=4145019
ConvertLineworkToMaskBlock
 A box will pop up. I usually choose the Select AEC Objects to Mask option and let the computer name the Mask Block. I also check the Erase layout geometry so it deletes the original polyline. After you hit OK you will be asked to select which objects you want masked, in this case I am masking a profile.
Before:
 After:
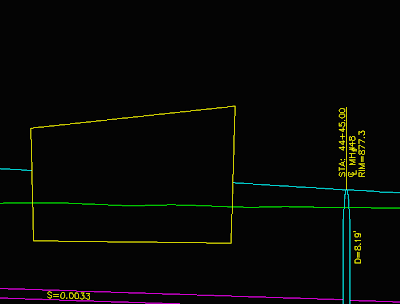
I masked the top profile.
Make sure you place the Mask Block on a non plot layer so it doesn’t show up. To add or remove objects just select the Mask Block right click and the option is there. You can also edit the shape using the edit profile in place option in the right click.

Monday, June 04, 2007
Other Commands with Multiple
Sunday, June 03, 2007
Packeteer and Civil 3d
If you don't know Packeteer, at least the product I am using at work, creates what is called a Wide Area File Service. For most of the other programs, including plane AutoCAD, it works great. It seems like we are using the same file server even though the offices are hundreds of miles apart. I think the main problem is data shortcuts and Packeteer wanting to make sure all of the data is up to date, but I'm not an IT guy.
