 An example of a label that utilizes it may be found here, under the date of 11-30-2007. It needs some work to be usable, but should point you in the correct direction.
Friday, November 30, 2007
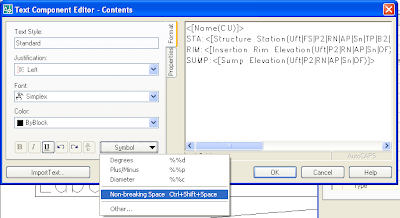
Non-Breaking Space
You can add a non-breaking space to a label to increase the number of lines that are in the label without showing any unwanted text. You can use the the short cut of Ctrl+Shift+Space or use the insert symbol, see the picture below:
An example of a label that utilizes it may be found here, under the date of 11-30-2007. It needs some work to be usable, but should point you in the correct direction.
An example of a label that utilizes it may be found here, under the date of 11-30-2007. It needs some work to be usable, but should point you in the correct direction.
Point Transformation
First of all I would like to thank Chris for allowing me to post my Civil 3D reminders here as well. I have referenced Chris' blog countless time to help me remember labeling ideas, routines, etc. 


Check results!
Yep, it's that easy!
Alternatively you can import your points from your handheld GPS unit using a drawing that is setup for Lats and Longs and then "Export" using the "Point File Format" that you created above.
BAM! You now have a point file that is on the coordinate system that corresponds to your design coordinate system.
Well have you ever struggled with the Transformation of points within Civil 3d? Well I have, so the purpose of this post goes along with Chris' theme of posting helpful reminders for the future.
Properly set the current drawing units and coordinate settings, located within the Settings tab of the prospector. (i.e. Where in the world are you or where were your points shot?)
Properly set the current drawing units and coordinate settings, located within the Settings tab of the prospector. (i.e. Where in the world are you or where were your points shot?)
Create an appropriate "Point File Format" (This is found in the settings or if you go to Points-> Import/Export Point -> Transfer Points, you can choose manage and then create a new user format).
-For my handheld points, I created a "Point File Format" that was Lat Longs -> WGS84 datum, Lat-Long, West Positive; Degrees -180 to +180. I then choose "deliminated by" and then placed a comma in the box. Next I set up the format of my source "Point File"; Point Number, DECGEG Latitude, DECDEG Longitude, Point Elevation, Raw Description.
-Since my project is located in San Bernardino County, I was able to use CalTrans' website to determine that I am in Zone 5 of the Californina State Plane and I am using the US Foot for my units and am using NAD83. As I did above, I need to create a new "Point File Format" for my NAD83 California State Planes, Zone V, US Foot format. Again I choose "deliminated by" and then placed a comma in the box and then set up the format for my destination "Point File"; Point Number, Grid Northing, Grid Easting, Point Elevation, Raw Description.
Then I click "OK" within the Transfer Command. A new text file is created with the Transformed Points.
Check results!
The text file titled "two" is the original point coordiante from the Handheld GPS device. The file titled "test" is the output from the transformation.
Yep, it's that easy!
Alternatively you can import your points from your handheld GPS unit using a drawing that is setup for Lats and Longs and then "Export" using the "Point File Format" that you created above.
BAM! You now have a point file that is on the coordinate system that corresponds to your design coordinate system.
AU Reminders
First I would like to introduce my coworker Jason to any of the regular viewers of my blog. Jason has helped me and the office I work in to make the transition to Civil3D from Land Desktop. Hopefully you will find Jason's reminders as helpful as you find mine. I would also like to thank Engineered Efficiency for the free shirt and Mastering Civil3D book, even if the book was a mistake on the part of one of the EE team members.
For the rest of the post it will be a reminder to me of my AU experience. The whole point of the blog was to put what I found out about Civil 3D and Map and Autocad here so I could remember what I figured out and how to recreate it. I usually regret finding something out and then having to do it over and not remembering how to do it. This blog seemed like a better container then the office network or my home computer, I just have to remember to use it.
First lesson I learned at AU this year is the a benefit of being a presenter is the ready supply of water and the quick access to the Internet in the Speaker Ready Room. Don't have to wait for a free computer in the common areas. You also have the opportunity to talk to the notables who bring you Civil 3D.
The second lesson I learned is that you should do a good job of doing your description of your class. I got this from feedback from my coworkers comments and my own presentation experience. My coworkers found that some classes didn't deliver on the description of the course. I think my problem was the exact opposite. I think I didn't convey the complexity of my presentation. I did submit it as an advanced course, but I lost half of my audience by the end. I did hear some positive feedback from some of the people who remained to the end. I probably should have stressed the modifying of rules rather than just covering the basics. I also learned that people care about seeing the menu bar, even if it is not pertinent to the concepts being presented. While not being able to see the menu bar was a technical difficulty out of my control, I thought it was interesting since most people should know what the Civil 3D menu bar looks like.
If I go next year I think I will try to remember to ask for a room on the strip. The view from the strip, I find, to be more interesting then the view I have of the Hilton Hotel and the city lights behind it.
If you do use AVI's in your presentation, I think it would be better to record the whole presentation, that way you aren't hindered by the powerpoint interface which doesn't seem optimized to use video within the program. I messed up twice with my mouse trying to pause the avi's.
I think they should show how big the class is going to be. In hearing the Webcasts for the presenters leading up to the event, it was conveyed that as the class size grows larger the technical content of the class may need to go down. I think this suggestion is made to satisfy the majority of the class who attends.
I am also looking forward to getting my resolution back to 1680x1050, the AU projectors are set to 1280x1024 and I find that too small on my laptop. I also can't wait to see the 2009 beta and the new features that will be included since I am signed up on the myfeedback.autodesk.com website.
Thursday, November 29, 2007
Link to AU Post
Link to the AU Post on the site:
http://civil-3d.blogspot.com/2007/11/autodesk-university-supercalifragilisti.html
http://civil-3d.blogspot.com/2007/11/autodesk-university-supercalifragilisti.html
Wednesday, November 28, 2007
Slope Only Pipe Rule
Would anyone be interested in a Slope Only pipe rule for Civil 3D? If you are email me at fredbobchris@gmail.com
Thursday, November 22, 2007
Adding Total Area to a Parcel Table
This short video shows how to add the total parcel area to a Parcel Area Table.
http://fredbobchris.googlepages.com/ParcelArea.html
As demonstrated in the video the overall parcel label style needs to be assigned to add it to the table. Just make one that doesn't show any portion of the label and it should work, or move the label off to the side so it doesn't print.
http://fredbobchris.googlepages.com/ParcelArea.html
As demonstrated in the video the overall parcel label style needs to be assigned to add it to the table. Just make one that doesn't show any portion of the label and it should work, or move the label off to the side so it doesn't print.
The video link doesn't work anymore, try this newer post for the steps: http://blog.civil3dreminders.com/2011/07/parcel-tabletotal-area.html
Tuesday, November 20, 2007
The Anatomy of a Rule
To create a pipe rule you need to understand the structure of a rule. The basic portions of the rule contain four parts. All of the parts start with the name of the Module followed by the name of the part of the rule. The four parts are called _GetInputParameters, _GetOutputParameters, _ApplyRule and _ValidationRule. The first two are usually called, but no code usually goes there. I'm not quite sure what it does, but since the OOTB rules don't use it I don't sweat it too much. The next two parts are where most of the work happens.
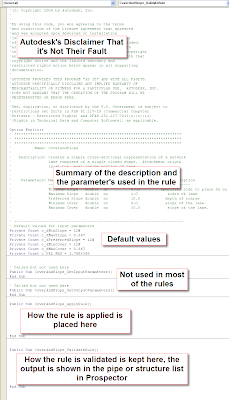
When you set up the XML file to tell Civil 3D what values to use, you probably want to have the user see the correct number format. Civil 3D uses a numeric code to determine what format the number should be. It is stored in the XML file under the TypeInfo under the Params folder. Type 25 is a percent number, Type 16 is feet or meters. Those are the two types used in the rules, I haven't tried to figure out what the other numbers do, so I can't provide what they do here.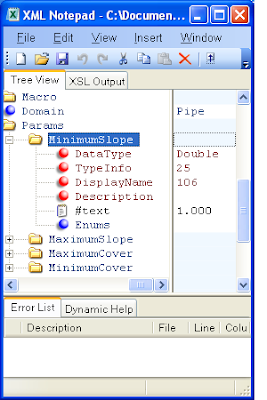
The _ApplyRule part tells Civil 3D how the rule should be applied. This part is where you want to tell the program how to apply the rule. I usually start with an existing rule that is close to what I want to accomplish and then modify it to meet my needs.
The _ValidationRule part tells Civil 3D how it should check to see how the rule is to be checked. If you don't want a warning message to show up in Prospector, just leave the code portion blank.

When you set up the XML file to tell Civil 3D what values to use, you probably want to have the user see the correct number format. Civil 3D uses a numeric code to determine what format the number should be. It is stored in the XML file under the TypeInfo under the Params folder. Type 25 is a percent number, Type 16 is feet or meters. Those are the two types used in the rules, I haven't tried to figure out what the other numbers do, so I can't provide what they do here.

While this isn't a complete list of steps to create the rule, it should provide a little more insight on how to create your own custom pipe rules.
Monday, November 19, 2007
Changing Drawing Units
Here is a way to change the units of a drawing and all of the feature settings of the objects.
http://fredbobchris.googlepages.com/ChangeUnits.html
If a little blue down arrow shows up after changing the values to the right of the unit changed, make sure to click the blue arrow to override the naughty children.
http://fredbobchris.googlepages.com/ChangeUnits.html
If a little blue down arrow shows up after changing the values to the right of the unit changed, make sure to click the blue arrow to override the naughty children.
Thursday, November 15, 2007
Autodesk University - Supercalifragilisticexpialidocious Sewer Design
Information for Supercalifragilisticexpialidocious Sewer Design:
VBA Programing Examples:
Laterals
Pipe List w/ Formula
Pipe Network Quantity
Alignment Custom Rule (C3DPipeRules.dvb)
Alignment Custom Rule XML (C3DPiperules.xml)
Links:
http://www.civil3d.com/2007/07/using-pipe-sample-vba/
http://www.civil3d.com/2007/11/modifying-cover-and-slope-rule/
http://civil-3d.blogspot.com/2007/11/anatomy-of-rule.html
Other Point Description Code Samples:
Pipe Slope: oPipe.Slope
Alignment Name: oPipe.Alignment.Name
Pipe Length: oPipe.Length2D
Connected Structure Start: oPipe.StartStructure.Name
Connected Structure End: oPipe.EndStructure.Name
Pipe Description: oPipe.Description
Pipe Diameter: oPipe.InnerDiameterOrWidth
I put all of my pictures, PowerPoint and cad files on the internet. They may be found here:
http://fredbobchris.googlepages.com/CV304-3P.zip
http://fredbobchris.googlepages.com/CV304-3P-CadFiles-1.zip
http://fredbobchris.googlepages.com/CV304-3P-CadFiles-2.zip
http://fredbobchris.googlepages.com/CV304-3P-CadFiles-3.zip
The screencast of the presentation may be found on the AU website.
Monday, November 12, 2007
Changing Profile Vertical Curve From K to Length
If you layed out a vertical curve using the K value, you can adjust the vertical curve by changing the profile to Entity based from PVI based. See the video in the link below to see a visual example:
http://fredbobchris.googlepages.com/ProfileKLength.html
http://fredbobchris.googlepages.com/ProfileKLength.html
Wednesday, November 07, 2007
Laydel Command
I did a video, without sound, of using the laydel command to delete layers from a drawing. Using the laydel command deletes the layers from the style and sets them to 0 after an audit.
Here is the link:
http://fredbobchris.googlepages.com/LAYDEL.html
Here is the link:
http://fredbobchris.googlepages.com/LAYDEL.html
Saturday, November 03, 2007
Expression to Control Rotation of Label
You can now use an expression to set the rotation of an object, in Civil 3D 2008. For instance if you want a Station Offset label to look like the picture below previously you needed two labels, one for the left and one for the right side of the alignment, or an expression to have two different label heights (see the style on 10-28-2007). To create an expression for the label we need to use an If statement to see if the Station Offset Label is to the left or right of the alignment. Then based on what the value is we set the rotation to 90 or 270 degrees. Since the rotation value uses radians, and I don't do radians, we will need to convert the degrees to radians with the DEG2RAD() function.
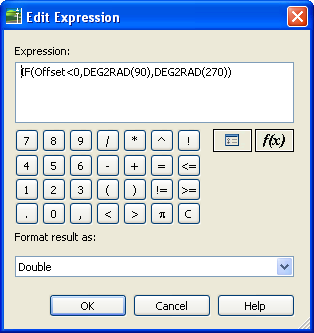 I placed an example that isn't pretty, but works on the Intermittent Block or Style of the Day site (see 11-03-07).
 To create an expression for the label we need to use an If statement to see if the Station Offset Label is to the left or right of the alignment. Then based on what the value is we set the rotation to 90 or 270 degrees. Since the rotation value uses radians, and I don't do radians, we will need to convert the degrees to radians with the DEG2RAD() function.I placed an example that isn't pretty, but works on the Intermittent Block or Style of the Day site (see 11-03-07).
 Thursday, November 01, 2007
Did you know?
Did you know that names in Civil 3D are case sensitive? So you can have Civil 3D objects with the same name, just with different capitilization. For instance if you have a street and you want multiple alignments representing the street, all of them can use the same name just with different capitilization. See below for an example:
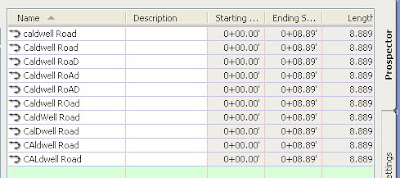
Just specify the title case you want when adding the Alignment Name to a label so they will all look like the same name.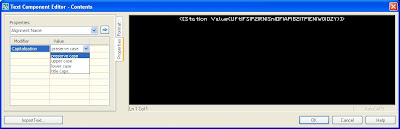
Just specify the title case you want when adding the Alignment Name to a label so they will all look like the same name.
Civil 3D Links
Well a we have a new hire and it was suggested I provide him some useful links and information with regard to Civil 3D and other work related information. Here are some links that I find useful:
Autodesk Related:
http://www.civil3d.com/
http://acecivil3d.blogspot.com/
http://usa.autodesk.com/adsk/servlet/index?siteID=123112&id=3091031
http://discussion.autodesk.com/index2.jspa?categoryID=17
http://discussion.autodesk.com/forum.jspa?forumID=83
http://discussion.autodesk.com/forum.jspa?forumID=85
http://discussion.autodesk.com/forum.jspa?forumID=33
http://usa.autodesk.com/adsk/servlet/index?siteID=123112&id=3566722
http://labs.autodesk.com/
http://au.autodesk.com/
http://aec.cadalyst.com/aec/article/articleDetail.jsp?id=282051
http://civil-3d.blogspot.com/
http://civil-3d.blogspot.com/2007/07/command-reminders.html
http://civilcommunity.autodesk.com/
http://www.google.com/reader/view/# (My subscriptions XML file)
Other Links:
http://www.ccb.org/
http://www.pcase.com/
http://www.coastalreprographics.com/index.asp
http://www.dipra.org/
Subscribe to:
Posts (Atom)