Have you ever wanted to know how steel pipe or other type of steel product is made? Well here’s your chance to find out. CONTECH is opening up there plants for tours across the country for SteelDay on September 24, 2010. Here’s a link for more information. You might see me at the Adelanto, CA plant if I can find a way to get there.
Monday, August 30, 2010
Friday, August 20, 2010
Jelly Belly Factory Tour – Fairfield, CA
I was going to try to tie this into Civil 3D, but I couldn’t come up with anything good, but if you do visit the source of some of the AU Beer you may want to also check out the Jelly Belly factory. You now the expensive bulk candy found in some stores. At the Jelly Belly Factory you can buy some Belly Flops at a fraction of the price. The only problem is you can’t pick the flavors you want. But if you visit the factory tour you can visit the sample bar and get a sample of the plethora (a word I learned about in the Three Amigos!) of flavors and types of candies available. The tour is also informative on how to make Jelly Bellys.


Wednesday, August 18, 2010
Autodesk 3ds Max Design Training - Day Three
US CAD, Steve Bennett Instructor
The video may take some time to load.
- Use mr Photographic Exposure Control with Mental Ray rendering engine.
- Gamma - Star Trek reference
- Recommended "gamma pipeline" (Search Term in help), workflow in help. Gamma correction is applied to images to make them look correct. The program applies another one if it already has one which can make the images look incorrect. Have to apply to material before it gets rendered. Setting may be turned on/off per style.
- Usually adopt the file's gamma and LUT settings, if the warning box comes up. May cause rendering problems.
- Light lister to manage multiple lights from one place.
- FG - Final Gather
- Add lighting to a material can then be applied to an object.
- Make sure to set the exposure control when using Mental Ray, can make the rendered image look dark.
- Background images require the Physical Scale needs to be Unitless, a value of around 80,000 may be used (Page 4-67).
- RAM Player (under Rendering Menu) can compare images side by slide by sliding triangles top and bottom to compare. Can also show a sequence of photos.
- http://www.gsd.harvard.edu/research/gsdsquare/Publications/BuildingSimulation2009.3dsMaxAndDaysim.pdf
- Create exterior lighting in the Settings button from the Create tab.
- Always choose yes to create a 'mr Sky' environmental map.
- The sun does not need to be actual distance from earth to the sun, just needs to be above the scene.
- Outdoor scenes don't get much reflection or refractions, change values to 3 in the Render dialog box below the render window.
- Ambient Occlusion (AO), shadows at corners or light bouncing between surfaces.
- For materials, don't use for items far away or not needed. Mostly for walls and ceilings.
- Makes rendering take longer, use where needed not in every material.
- I suck at remembering vocabulary terms, but am good at remembering the concepts.
- Only ray trace shadows are applicable to ray trace rendering, the others are not applicable.
- Some good render settings, Diffuse Bounces should be 2 instead of 8.
- Look on page 5-14 if dots show up. Change Final Gather Settings in Render Setup.
- Image Precision (Antialiasing, keep values divisible by 4 usually). Controls how crisp edges appear.
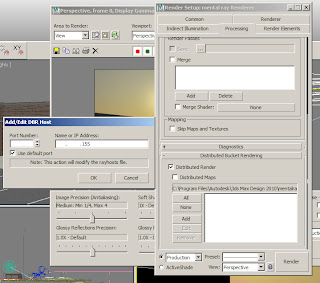
- Creating a Render Farm
- Get the IP address of computer
- Enter it into the dialog box


- Make sure the computers are selected when rendering for them to be included.
- Create mental proxy graphics to export it out to a file and then improve performance. Kind of like datashortcuts in Civil 3D without the object living in a drawing, but an external file.
- Sky Portal - Light covering a window, raised light level for the scene. Primarily for interior shots.
- Use photometric lights with mental ray.
- Can do iterative rendering by selecting the object, then the icon to the right and then rerun and it just does the selected item.
- If doing a large project, Render Output to external file to create images.
- You are the key person.
- EPW file source: http://apps1.eere.energy.gov/buildings/energyplus/cfm/weather_data.cfm
- Autodesk University Class DV310-1 Creative Animation Techniques Used to Reveal Models in Advanced Visualization Projects

The video may take some time to load.
Budweiser Factory Tour – Fairfield, CA
Quite often I find my self in Fairfield, CA for business. I try to make it out to some of the local attractions when I’m there. Fairfield is home to one of the smaller beer factories for Budweiser Beer. If you’ve been to Autodesk University and had a Budweiser chances are it came from this factory. The factory conducts tours for the public.


Inside the factory is large tanks in which grains are turned into alcohol. Not only do they explain the process on how beer is made the structure from a Civil Engineering perspective is interesting.


There are large columns and cross bracing holding the building up in case of a seismic event. In fact there is twice the amount of steel in the structure compared to the other factories.


The factory has some open space because they installed a fancier bottling system. I don’t remember the specifics, but it can bottle more beer then the factory can produce and takes up about 1/2 the space as the old equipment. The little circles are drainage inlets.


The tour is interesting and at the end or the beginning of the tour you can sample two beverages of your choice or all the soda you can drink. Also provided is pretzels. Worth the stop even if you don’t drink beer. If you love Budweiser commercials there’s even a television screen showing a variety of current and historic commercials.
Tuesday, August 17, 2010
Autodesk 3ds Max Design Training - Day Two
US CAD, Steve Bennett Instructor
- Need to be in modify tab to get Graphite Modeling Tools to show up for an object.
- Look at creating a tool to create Topology lines instead of hand drawing them. Create polyline around area and then draw lines spaced a distance apart.
- Cool terrain tools and simplifying terrain surfaces.
- Draw 2D in AutoCAD and bring it into 3ds Max, instead of drawing it in 3ds Max. Easier to draw 2D lines there.
- Vertice Types
- Corner
- Bezier - Adds curves to the lines (similar to a spline)
- Bezier/Corner
- Always choose to close the spline if you want a closed object.
- Can go back in and add vertex types to the vertices.
- Yellow vertices indicate the vertices are not connected. First vertex it is called young jedi.
- Make sure when using the Lathe modifier that it is closed.
- Boolean is named after mathematician George Boole.
- Don't have coplanar objects when doing boolean faces.
- Sweep - Single Shape.
- Loft - Multiple shapes.
- Align first vertex at the same location.
- If snap active (2D/3D) the move gizmo does not work.
- P to get perspective.
- Link FBX File: http://2d-or-not-2d.blogspot.com/2009/01/link-fbx-file-like-dwg-file-in-3ds-max.html
- Freezing is like a lock in AutoCAD. Can still see the object, but it's not editable.
- Use materials to create textures, Bump file darker farther away lighter closer. Adjust color scale based on object types.
- Need to make sure to rename the material when creating a new material by dragging to an empty material default.
- ProMaterials get you started out quickly when using Mental Ray.
- Page 3-95 of book to look at ProMaterials for types and explanation.
- Reflectance is the amount of light that bounces off a surface, page 3-85 has a list of typical values.
- Missed about an hour of the class for a conference call regarding a project. Missed a bunch of stuff on materials.
- Objects, Materials, Maps - Map Scaling Explicit over entire site one, Map Scaling Continuous individual bitmap applied many times to an object.
- Material that has map modifier need same real world scale.
- Places materials are saved: Material Editor, Material Library, Viz Render Material File (Abandoned Product).
Monday, August 16, 2010
Autodesk 3ds Max Design Training - Day One
US CAD, Steve Bennett Instructor
- Autodesk 3ds Max Design doesn't come with SDK, need 3ds Max to do programming.
- LandXML isn't fully supported, just brings in surfaces.
- Set goals.
- Storyboard to focus what tasks need to be completed, keep from doing things or objects that won't be seen.
- Journal of key tasks, project size - creates ability on figuring out how long modeling will take.
- More lights, more rendering time.
- I'm seeing lots of Star Wars references in the next three days.
- Need post production work to get the render finished or add features, usually not done once the render is complete. Go in and modify lighting, add effects, etc.
- Two modification words in 3ds Max:
- Transform - Move Rotate Scale
- Modify - Change object's geometry
- Modifying objects, if Extrude is used and edit mesh things may go bad, Use Hold/Yes to prevent unstable drawing behaviour.
- Go up to the top before trying to select something else after modifying an object.
- Fetch - Restore the way it was before the hold was placed. Useful since Max only has about 20 undo's/redos (not unlimited).
- Hold - Kind of a snapshot of the model in which you can go back to in case you don't want the changes to be done. Kind of a super undo button that you have to set up.
- Teapot object - Easy for the developer's to test with complex shapes (Bunnies appear popular now)
- Middle orbit item suggested to use, orbits around the selected object.
- Middle Zoom wheel doesn't match AutoCAD. Press:
- Ctrl + Press Middle Mouse Wheel to (PAN)
- Alt + Press Middle Mouse Wheel to (Orbit)
- Shift + Press Middle Mouse Wheel (PAN, constrained in one direction)
- Alt + Shift + Press Middle Mouse Wheel (Orbit, constrained in one direction)
- Alt + W Toggles between veiwport layouts.
- Shift + W to get Steering Wheel
- Long Live the Steering Wheel!!! It's pretty cool once you get used to it. Rewind Tool is especially cool and useful.
- Object Selection Methods
- Transforms on top can be active, which may cause problems by accidentally selecting and moving objects.
- Paint Selection is cool.
- Select from Scene dialog box, make sure names are used that make sense. Don't end up with Pyramid01, Pyramid02, Pyramid03, etc... (Keyboard shortcut H)
- Can do selection by layer if AutoCAD drawing put in.
- Right click on Modify Parameters to set to default value.
- Less polygons mean better performance
- Try to eliminate overlapping objects. Why? I didn't ask.
- "Hint: It is best not to use the Scale transform directly on objects. Instead, apply an XForm modifier to the objects and then Scale the XForm gizmo. This avoids many problems in animation, because you can define when the scale is taking place at the sub-object level."(essentially avoid scaling objects if you plan on animating it, non animated objects OK)
- When transforming, to cancel right click the mouse and it will go back to the original location. (While holding on to the left mouse button)
- Press Q to exit out of Transform items.
- Rule of 20' for detail. Can not show items if they won't be seen a distance away.
- Can right click and enter data into the Move Transform Type-in, also works in Zoom, Rotate and Scale. The dialog box is modeless.
- Add Edit Poly modification rather then convert the object to Poly or Mesh to keep object history. Add the Edit Poly to the stack.
- No copying, called cloning. Kind of like blocks when using Instance. Reference is copying the block and can add modifications to it (like dynamic blocks but better). A copy is a wholly separate object.
- Can make unique later on, making it a copy.
- Make sure not to explode groups which have been animated. The program doesn't attach the animations to the objects in the group, it just deletes it.
- Press G to hide/show the grid.
- Use Shift key with the Graphite Modeling Tools to get dialog boxes to show up.
- Reference, things that change, import items that won't change.
- On the File Link Settings: DWG Files make sure to "Use Scene material definitions" and "Use scene material assignments on Reload" on the Advanced Tab. (File Link Manager)
- Lines become Splines in 3ds Max.
- Press M for materials
- Can copy objects in Modifier list and paste it into another modifier.
- Don't let the viewports drive you nuts, it may show up in the rendering.
Drainage Inlets – Waltham, MA
Here are some pictures of drainage inlets from my stay in Waltham, MA. In California we don’t get inlets that look this antiquated. I’m wondering it there was some type of challenge to see how much iron you could use for an inlet.


Don’t see too many rounded inlets in California:


All of the inlets appeared pretty small compared to the work I’ve done in California. The Waltham area must have more smaller more frequent storms.
Saturday, August 14, 2010
WYSIWYG – AutoCAD 2011 and AutoCAD LT 2011: No Experience Required
I recently received a copy of Donnie Gladfelter’s book AutoCAD 2011 and AutoCAD LT 2011: No Experience Required to review. The book is a behemoth at 982 pages and packs all of the steps required to create a plan set and model of The Cad Geek’s Cabin inside. By using the example the user is taught how to create a plan set and the steps required to accomplish it. The book is well laid out starting with a review of AutoCAD’s user interface and ending with converting the 2D linework into a 3D model of the building complete with materials. The step by step instructions are enhanced with AutoCAD screenshots of both where to pick and how the final product should look like.
The target of the book is primarily new users to the program although newer features of the program are included which could benefit experienced users. Examples of this include the parametric, newer 3D tools and dynamic blocks. I for one hadn’t noticed the Infer Constraints button on the status bar. The Infer Constraints button, according to the book, “…will automatically apply constraints between objects as you create or modify them.” Another feature that I forgot about was the ability to detach the ribbon from the top or remove a panel from it and drag it off to the side. This provides functionality similar to toolbars the ribbon replaced.
For the most part the book is an easy read and provides explanations and reasons for doing the steps. I also liked where the book provided examples on how to accomplish the same task in different ways. Such as using lines and offsetting, and them trimming or using polylines and offsetting them without having the need to go back and trim. The book has an index and glossary providing an easy way to find topics in the book.
If we had a new hire in the office who wanted to learn AutoCAD I wouldn't hesitate using this book as a learning tool. It would provide a good foundation to build CAD knowledge.
Disclaimer: I received the book from the publisher free of charge.
Wednesday, August 11, 2010
Group Breaklines with Mid-Ordinate Distance One and Greater
This code was intended to search through a TIN surface’s breaklines and add the ones with a mid ordinate distance of 1 or greater into a group. It works except when the breakline names are duplicated. In that case only one set of breaklines are shown. It appears to be a bug in the API.
Imports Autodesk.AutoCAD.Runtime
Imports Autodesk.AutoCAD.ApplicationServices
Imports Autodesk.AutoCAD.EditorInput
Imports ACADdb = Autodesk.AutoCAD.DatabaseServices
Imports Autodesk.Civil.DatabaseServices
Imports Autodesk.AECC.Interop.Land
Imports Autodesk.AutoCAD.Interop
Imports Autodesk.AutoCAD.Interop.Common
Imports Autodesk.AutoCAD.DatabaseServices
Imports Quux.C3DUtilities

<Assembly: CommandClass(GetType(LabelNote))>

Public Class LabelNote

    <CommandMethod("C3DRGroupBreaklinesByMidOrdDistance")> _
    Public Sub ColorBreaklines()
        Try

            'Get Civil 3D application, document and database
            Dim oCivil As New AeccAppConnection

            ' Have the user select a general note label.
            Dim ed As Editor = Application.DocumentManager.MdiActiveDocument.Editor
            Dim entopts As New PromptEntityOptions("Select a TIN Surface: ")
            entopts.SetRejectMessage("You did not select a valid entity")

            Dim entRes As PromptEntityResult = ed.GetEntity(entopts)

            If entRes.Status = PromptStatus.OK Then
                Dim entid As ObjectId = entRes.ObjectId
                Dim db As Database = Application.DocumentManager.MdiActiveDocument.Database
                Dim tm As Autodesk.AutoCAD.DatabaseServices.TransactionManager = db.TransactionManager
                Using myT As Transaction = tm.StartTransaction()
                    Dim oSurfaceEnt As ACADdb.Entity = DirectCast(tm.GetObject(entid, OpenMode.ForWrite, True), ACADdb.Entity)
                    Dim oSurface As AeccTinSurface = oCivil.AeccDoc.ObjectIdToObject(CType(oSurfaceEnt.ObjectId.OldIdPtr, Long))
                    Dim oBreaklines As AeccSurfaceBreaklines = oSurface.Breaklines
                    Dim oBreakline As AeccSurfaceBreakline
                    Dim objColl As New ObjectIdCollection

                    For Each oBreakline In oBreaklines
                        If oBreakline.MidOrdinateDistance >= 1 Then
                            Dim vEntities() As Object
                            vEntities = oBreakline.BreaklineEntities
                            Dim oEntity As AcadEntity
                            For Each oEntity In vEntities
                                objColl.Add(ACADdb.DBObject.FromAcadObject(oEntity))
                            Next
                        End If
                    Next
                    CreateGroup("C3DRBreaklinesToReadd", objColl)
                    myT.Commit()
                End Using
            End If
        Catch ex As Exception
            Dim oC3DR As New C3DRemindersPack.Utilities
            oC3DR.MessageWriter("Error changing note label: " & ex.Message)
        End Try
    End Sub

    Private Function CreateGroup(ByVal sName As String, ByVal ObjIds As ObjectIdCollection) As Boolean
        Dim doc As Document = Application.DocumentManager.MdiActiveDocument
        Dim db As Database = doc.Database
        Dim ed As Editor = doc.Editor
        Dim tr As Transaction = db.TransactionManager.StartTransaction()
        Using tr
            Dim gd As DBDictionary = DirectCast(tr.GetObject(db.GroupDictionaryId, OpenMode.ForRead), DBDictionary)

            Try
                ' Validate the provided symbol table name
                SymbolUtilityServices.ValidateSymbolName(sName, False)

                ' Only set the block name if it isn't in use
                If gd.Contains(sName) Then
                    ' A group with this name already exists, erase it.
                    ' Dim oGroup As Group = DirectCast(tr.GetObject(gd.Item(sName).ObjectId, OpenMode.ForWrite), Group)
                    EraseGroup(gd.GetAt(sName))
                End If
                Dim oGroup As New Group(sName, True)
                ' Add the new group to the dictionary
                gd.UpgradeOpen()
                Dim oGroupId As ObjectId = gd.SetAt(sName, oGroup)
                tr.AddNewlyCreatedDBObject(oGroup, True)

                oGroup.InsertAt(0, ObjIds)
                tr.Commit()
            Catch
                ed.WriteMessage(vbLf & "Invalid group name.")
            End Try

        End Using


    End Function

    Private Function EraseGroup(ByVal objId As ObjectId) As Boolean
        Dim doc As Document = Application.DocumentManager.MdiActiveDocument
        Dim db As Database = doc.Database
        Dim ed As Editor = doc.Editor
        Dim tr As Transaction = db.TransactionManager.StartTransaction()
        Using tr
            Try
                Dim oGroup As Group = DirectCast(tr.GetObject(objId, OpenMode.ForWrite), Group)
                oGroup.Erase()
                tr.Commit()
            Catch ex As Exception
                Dim oC3DRUtil As New Utilities
                oC3DRUtil.MessageWriter("Error erasing Group: " & ex.Message)

            End Try

        End Using


    End Function

End Class
It doesn’t appear to work in Civil 3D 2010 or 2011.
Saturday, August 07, 2010
500th Post Giveaway Results
The comments for the 500th post were put into a hat,


My answer to the question was California State Route 1, also known as Pacific Coast Highway, Cabrillo Highway or Shoreline Highway. While most of the route is maintained like any other road; the stretch from Northern San Luis Obispo County to the City of Carmel is under constant maintenance. After each rainy season debris from above comes falling on the road or parts of the road disappear into the ocean. While the original construction costs may not have been large the ongoing maintenance costs are quite large. Most of the terrain in the troublesome stretch looks like this.

Things to Try in San Francisco When Visiting Autodesk’s The Gallery at One Market Street
I tend to see things that seem interesting to see in far away places, but forget about them once I’m there. I’m going to keep this post as a reminder of places. Have one to share, leave it in the comments.
http://ilikeikesplace.com/ – 2 Miles down the street.
http://www.kindersbbq.com/ – Not really near Market Street, but located in the bay area, tried it this week and it was delicious. Free soda with the Ball Tip Combo.
Los Angeles
http://nataspastries.com/about.htm - Natas Pastries, LA's Portuguese Bakery & Cafe
Friday, August 06, 2010
Modifying Text Labels
Ever have lots of General Notes styles you have modified that need remodification or need a bunch of general notes changed by say an incremental number.In the Civil 3D 2011 .NET API one can override text components. Here’s a sample showing how to change the first text component in a label.
Imports Autodesk.AutoCAD.Runtime
Imports Autodesk.AutoCAD.ApplicationServices
Imports Autodesk.AutoCAD.EditorInput
Imports Autodesk.AutoCAD.DatabaseServices
Imports Autodesk.Civil.DatabaseServices

<Assembly: CommandClass(GetType(LabelNote))>

Public Class LabelNote

    <CommandMethod("C3DRChangeNoteLabel")> _
    Public Sub ChangeNoteLabel()
        Try
            ' Have the user select a general note label.
            Dim ed As Editor = Application.DocumentManager.MdiActiveDocument.Editor
            Dim entopts As New PromptEntityOptions("Select a general note label: ")
            entopts.SetRejectMessage("You did not select a valid entity")

            Dim entRes As PromptEntityResult = ed.GetEntity(entopts)

            If entRes.Status = PromptStatus.OK Then
                Dim entid As ObjectId = entRes.ObjectId
                Dim db As Database = Application.DocumentManager.MdiActiveDocument.Database
                Dim tm As Autodesk.AutoCAD.DatabaseServices.TransactionManager = db.TransactionManager
                Using myT As Transaction = tm.StartTransaction()
                    Dim oNoteLabel As Label = DirectCast(tm.GetObject(entid, OpenMode.ForWrite, True), Label)
                    oNoteLabel.SetTextComponentOverride(oNoteLabel.GetTextComponentIds(0), _
                                                        "Override", Autodesk.Civil.TextJustificationType.Center)

                    myT.Commit()
                End Using
            End If
        Catch
            Dim oC3DR As New C3DRemindersPack.Utilities
            oC3DR.MessageWriter("Error changing note label")
        End Try
    End Sub

End Class
Sunday, August 01, 2010
500th Post – A BIM Rant
It’s hard to believe this blog has hit 500 posts. I haven’t done it alone, a coworker wrote one of the most popular early posts on point transformation as well as providing a whole lot of problems (or opportunities) that turned into blog posts. The Autodesk, AUGI and The Swamp discussion groups provided a bunch of problems that also turned into blog posts. I’ve solicited requests from readers for ideas and got quite a few posts out of it. I’m working on a project that requires bringing it into Navisworks and providing a visualization of the project, which brought about this post. It seems like there is no easy way to create a retaining wall within Civil 3D for visualization purposes.
Much lately has been made of BIM from product marketers, trade magazines and blogs. 
But what is a BIM product? My broad definition of a BIM product is one that utilizes objects to model 90% of the design with a method to approximate the remaining 10% of the design with a generic objects. I’ve started to get familiar with Revit. While I haven’t done a complete project, it appears to be a BIM product. I can layout the walls utilizing a wall object. Within the wall objects I may add walls and windows that affect the walls. Change the size of the window, the wall updates to accommodate the new window sizes. Walls may be tied to levels making it easy to tie the the wall to a certain height. Change the level and the wall height updates. Most of the Architecture items are there.
Is Civil 3D a BIM product? I’d have to say a resounding no, it doesn’t even come close to being one. 
Now the topic of this post wouldn’t have happened if Autodesk was positioning Civil 3D as a BIM product. 
Really I just want a product that works, and for the most part Civil 3D does work, it just doesn’t work as a BIM product.

Thanks for reading the blog. To celebrate my 500th post I’m giving away some Autodesk Swag. A briefcase from AU and an Autodesk pen which as a light. To win this swag provide a comment below stating what the most expensive road in the world is (inflation adjusted and you don’t have to be correct). I’ll put all of the comments into a hat and let my oldest daughter pick a name from the hat. A picture of the swag is below.


Subscribe to:
Posts (Atom)
LinkWithin
