Due to an overwhelming response to the Giveaway, I'm adding a signed copy of Mastering AutoCAD Civil 3D 2008 to the box.
Now to the last post of the month. If you use the vertical subassembly you may notice that it has a slight offset to the right. This is because a TIN surface cannot have a vertical face. The offset works great if it is added to the right side of the assembly, but it can cause problems if it has been added to the left side. To correct it you can download Microsoft Visual Studio Express (vb.net version) and then change then change the code and then rebuild the project. Since most people don't have Microsoft Visual Studio I'm going to modify the VBA version of the subassembly.
The first step is to load the C:\ProgramData\Autodesk\C3D 2009\enu\C3DStockSubassemblyScripts.dvb (this is the Vista path, you'll have to find the XP path if that's the system you are using) using the VBAMAN command. Then press the SaveAs button to make a copy of it. Then press the Visual Basic Editor button to bring up the Microsoft Visual Basic editor. I like clearing out the stuff I don't need, so I deleted the modules I don't need. The list of Modules that you need are shown in the picture below.
You don't really need the UrbanCurbGutterValley1 (Urban), but I'm going to use the side code from it. So double click on the UrbanCurbGutterValley1 to get the window to pop up. Also do the same for the LinkVertical (Link) Module. Then copy some lines of code from the Urban to the Link as shown below:
This line of code gets the side input we'll add to the subassembly.
This line of code flips the .002 based if it is right or left. For the right side it stays positive and for the left side it changes to negative. This line of code is applied when the subassembly is shown in the assembly.
This does the same as above, but it applies when the corridor is being built.
So now we have changed all of the code we need to change. So before we're done lets change the name of the module. I'm going to change it to LinkVertical2.
Also change all of the instance of LinkVertical to LinkVertical2. To do this press ctrl+H and type in LinkVertical in the top box and LinkVertical2 in the bottom box. Then press Replace all. Press the save button. Also change the C3DStockSubassemblyScripts to the name of the dvb file.
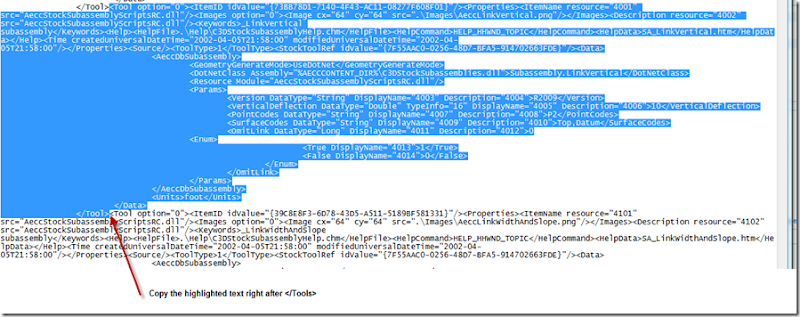
Next open the C:\ProgramData\Autodesk\C3D 2009\enu\Tool Catalogs\Road Catalog\C3D Imperial Generic Subassembly Catalog.atc file in Notepad. Copy the vertical link tool text as shown below:
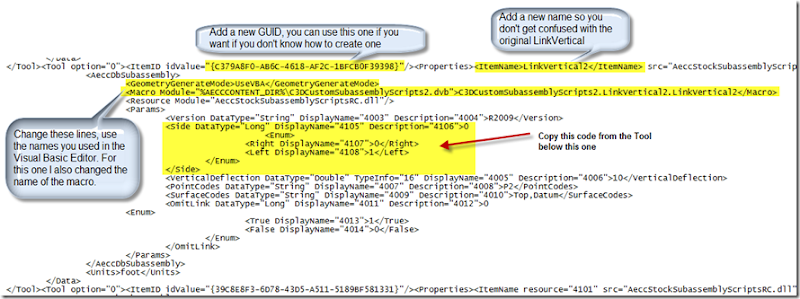
Next make the revisions shown below to the copied code:
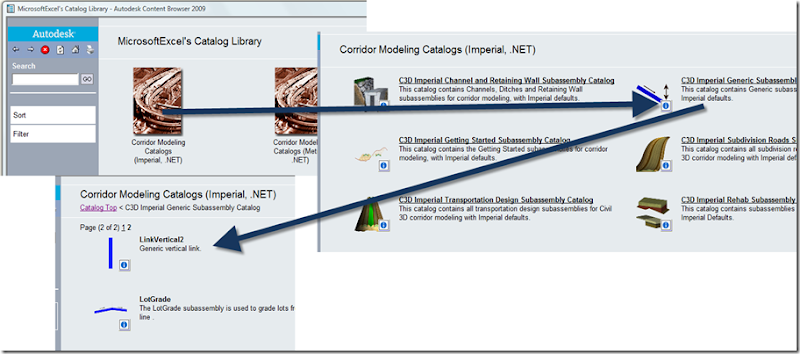
Save the file and then go into the Catalog and find the LinkVertical2. Drag it to the Tool Palette using the iDrop. Then use the subassembly in the normal manner.
I posted the revised subassembly on this page: http://style.civil3dreminders.com/customsubassemblies
You can make similar adjustments to the other subassemblies using this method. You may get quicker results if you modify the vb.net code, but that's another post.


2 comments:
It function beatiful! I need to do the same in Civil 2008. Would you help me?
Thanks a lot
Sergio
The steps to do it in 2008 will be the same as 2009, just change the file locations to the corresponding on to the 2008 program.
Post a Comment